Data Visualization Made Easy
November 2, 2018
Artworks that work for your Manuscripts
November 2, 2018Presentation Matters; Effective Table Formatting Tips
Tables are an essential tool that research scholars and students use to present their information in a symmetrical and aesthetic manner. There are two key applications that are used for creating tables which includes; MS-Word and MS-Excel. Depending on your requirement, you can opt to create tables in Word or Excel. In some instances, scholars and students used both Word and Excel to present their information. But formatting a table is not an easy task. Sometimes just including a table within a word document can alter the entire arrangement or symmetry of your text content. With this article, we present you with useful tips that you can utilize to effectively include and format your tables for better presentation.
There are several types of formatting attributes that can be applied to tables within MS-Word to ensure that key information is highlighted and presented in the right manner. Aspects such as spacing, borders and shading, alignment etc., are basic alterations that you can use for formatting your table. Read on to learn about table formatting tips and tricks.
Tips and Tricks
Trick #1: Adding Diagonal Borders
MS-Word enables you to add borders to your tables. With Word you can place borders on any side of the table – right, left, top and bottom. Though most researchers are aware of this feature, what many don’t know is that you can also add diagonal borders to cells. It means that you can add a border from the top-right corner of the cell to the lower left corner. To add diagonal borders to your cell, take the following steps:-
- Create a table using the normal procedure.
- Choose the cell where you want to add a diagonal border.
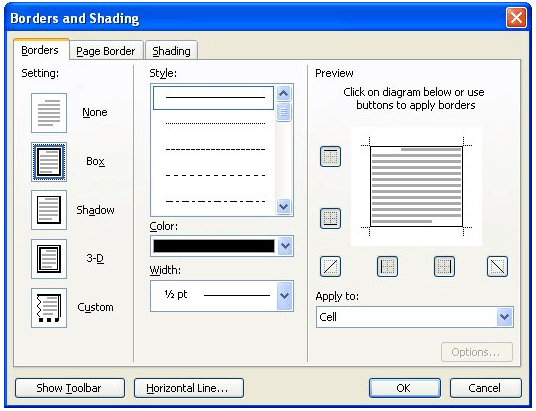
- Select the borders and shading option from the menu for ‘format’. The dialog box for borders and shading pops up.
- Ensure that the tab for borders is selected. (refer to figure 1)
Figure 1:

Trick #2: Adding Gridlines to your Table
There are many features in MS-Word and particularly the table feature of MS-Word is very potent. Auto-formatting features are also included which enables you quick table formatting which also includes adding gridlines. However, if you are desirous of adding gridlines to only one specific portion of your table (not all cells), then you have to do it manually. Add grid to any portion of your table using the following steps:-
- Choose those cells within the table that needs to be included within the grid.
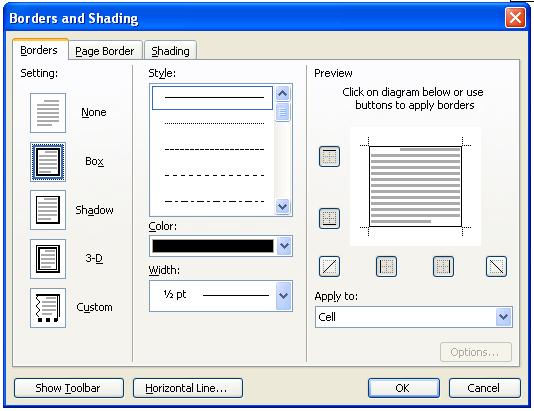
- Select the borders and shading option from the menu for format. You will be presented with the dialog box for cell borders and shading (refer figure 2).
Figure 2:

- Ensure that the borders tab is selected.
- Select grid in the preset box on the upper left corner.
- Alter any individual line styles as you deem fit.
- Click on OK.
These are just a few tips that you can use to format your tables in MS-Word. However, this is not the end. There is much more that you can do to format your table for better presentation. We have also not covered formatting tables within Excel spreadsheets which is slightly complex as compared to Word. But don’t sweat yet because we will be following up this article with another new article that will enlighten you with additional tricks to format your table in Word while offering you new insights about table formatting in Excel. Do come back.
